兴国资源网 Design By www.nnzcdc.com
锣鼓喧天送龙归,鞭炮声响银蛇催。蛇继龙神腾空飞,风调雨顺东风吹。PS联盟全体成员恭祝大家:新春钞票无处堆,财源滚来没法推!新年快乐!
效果图基本上都是由立体图形构成,其中立体字较多,制作的时候重点掌握一组文字的制作方法,其它的基本类似。需要渲染的立体面较多,制作的时候一定要保持耐心。
最终效果

1、新建一个1024 * 768像素的文件,选择渐变工具,颜色设置如图1,拉出图2所示的径向渐变作为背景。

<图1>

<图2>
2、现在来制作立体字部分,先来制作“新年快乐”,需要完成的效果如下图。

<图3>
3、打开下图所示的PNG素材,把文字多进来,解锁后放到合适的位置。

<图4>
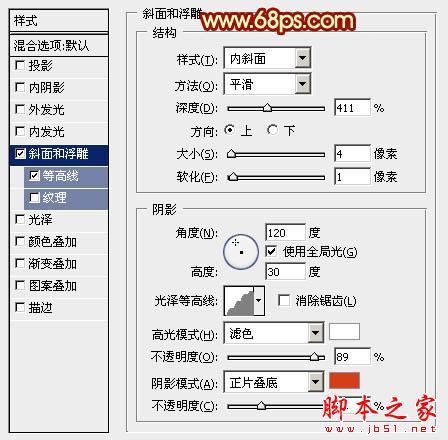
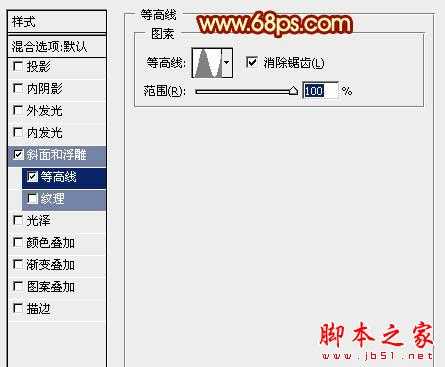
4、创建文字缩略图调出图层样式,设置斜面和浮雕,等高线,参数及效果如下图。
<图5>
<图6>

<图7>
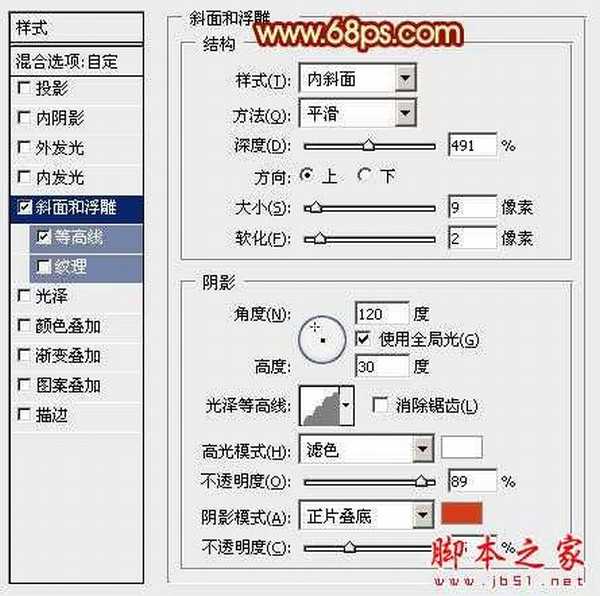
5、按Ctrl + J 把当前文字图层复制一层,然后双击副本缩略图调出图层样式,重新设置一下斜面和浮雕样式的参数,等高线不变,确定后把填充改为:50%,效果如图9。
<图8>

<图9>
6、背景图层上面新建一个组,现在来制作文字的立体面部分。在组里新建一个图层,用钢笔勾出图10所示的选区,拉上图11所示的线性渐变,只要好渐变的方向。

<图10>

<图11>
7、其它立体面的制作方法同上,需要制作的面较多,需要有点耐心,过程如图12 - 14。

<图12>

<图13>

<图14>
8、在背景图层上面新建一个图层,用钢笔勾出下图所示的选区,拉上图16所示的线性渐变。底部边缘部分用减淡工具稍微涂亮一点。

<图15>

<图16>
9、在背景图层上面新建一个图层,用钢笔勾出下图所示的选区,拉上同上的线性渐变。

<图17>
上一页12 下一页 阅读全文
效果图基本上都是由立体图形构成,其中立体字较多,制作的时候重点掌握一组文字的制作方法,其它的基本类似。需要渲染的立体面较多,制作的时候一定要保持耐心。
最终效果

1、新建一个1024 * 768像素的文件,选择渐变工具,颜色设置如图1,拉出图2所示的径向渐变作为背景。

<图1>

<图2>
2、现在来制作立体字部分,先来制作“新年快乐”,需要完成的效果如下图。

<图3>
3、打开下图所示的PNG素材,把文字多进来,解锁后放到合适的位置。

<图4>
4、创建文字缩略图调出图层样式,设置斜面和浮雕,等高线,参数及效果如下图。

<图5>

<图6>

<图7>
5、按Ctrl + J 把当前文字图层复制一层,然后双击副本缩略图调出图层样式,重新设置一下斜面和浮雕样式的参数,等高线不变,确定后把填充改为:50%,效果如图9。

<图8>

<图9>
6、背景图层上面新建一个组,现在来制作文字的立体面部分。在组里新建一个图层,用钢笔勾出图10所示的选区,拉上图11所示的线性渐变,只要好渐变的方向。

<图10>

<图11>
7、其它立体面的制作方法同上,需要制作的面较多,需要有点耐心,过程如图12 - 14。

<图12>

<图13>

<图14>
8、在背景图层上面新建一个图层,用钢笔勾出下图所示的选区,拉上图16所示的线性渐变。底部边缘部分用减淡工具稍微涂亮一点。

<图15>

<图16>
9、在背景图层上面新建一个图层,用钢笔勾出下图所示的选区,拉上同上的线性渐变。

<图17>
上一页12 下一页 阅读全文
兴国资源网 Design By www.nnzcdc.com
广告合作:本站广告合作请联系QQ:858582 申请时备注:广告合作(否则不回)
免责声明:本站资源来自互联网收集,仅供用于学习和交流,请遵循相关法律法规,本站一切资源不代表本站立场,如有侵权、后门、不妥请联系本站删除!
免责声明:本站资源来自互联网收集,仅供用于学习和交流,请遵循相关法律法规,本站一切资源不代表本站立场,如有侵权、后门、不妥请联系本站删除!
兴国资源网 Design By www.nnzcdc.com
暂无评论...
P70系列延期,华为新旗舰将在下月发布
3月20日消息,近期博主@数码闲聊站 透露,原定三月份发布的华为新旗舰P70系列延期发布,预计4月份上市。
而博主@定焦数码 爆料,华为的P70系列在定位上已经超过了Mate60,成为了重要的旗舰系列之一。它肩负着重返影像领域顶尖的使命。那么这次P70会带来哪些令人惊艳的创新呢?
根据目前爆料的消息来看,华为P70系列将推出三个版本,其中P70和P70 Pro采用了三角形的摄像头模组设计,而P70 Art则采用了与上一代P60 Art相似的不规则形状设计。这样的外观是否好看见仁见智,但辨识度绝对拉满。
更新日志
2025年02月27日
2025年02月27日
- 小骆驼-《草原狼2(蓝光CD)》[原抓WAV+CUE]
- 群星《欢迎来到我身边 电影原声专辑》[320K/MP3][105.02MB]
- 群星《欢迎来到我身边 电影原声专辑》[FLAC/分轨][480.9MB]
- 雷婷《梦里蓝天HQⅡ》 2023头版限量编号低速原抓[WAV+CUE][463M]
- 群星《2024好听新歌42》AI调整音效【WAV分轨】
- 王思雨-《思念陪着鸿雁飞》WAV
- 王思雨《喜马拉雅HQ》头版限量编号[WAV+CUE]
- 李健《无时无刻》[WAV+CUE][590M]
- 陈奕迅《酝酿》[WAV分轨][502M]
- 卓依婷《化蝶》2CD[WAV+CUE][1.1G]
- 群星《吉他王(黑胶CD)》[WAV+CUE]
- 齐秦《穿乐(穿越)》[WAV+CUE]
- 发烧珍品《数位CD音响测试-动向效果(九)》【WAV+CUE】
- 邝美云《邝美云精装歌集》[DSF][1.6G]
- 吕方《爱一回伤一回》[WAV+CUE][454M]
