兴国资源网 Design By www.nnzcdc.com
用阳光温暖羊年的脚步,用幸福美化羊年的风景,用快乐编织羊年的故事,用平安开拓羊年的道路,用真诚传递羊年的祝福。愿你羊年快乐不断,幸福绵绵!
制作贺卡之前,先多欣赏一下高手的作品,确定好像要的风格。然后搜集一些符合风格的素材,再按自己的思路去组合溶图等,做出像要的效果。
最终效果

1、新建一个1000 × 700像素,分辨率为72的画布,新建一个组命名为“背景”,如下图。

<图1>
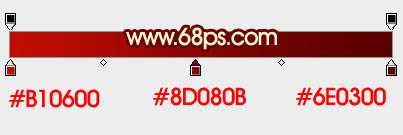
2、在组里新建一个图层,选择渐变工具,颜色设置如图2,然后由中心向边角拉出图3所示的径向渐变作为背景。
<图2>

<图3>
3、创建亮度/对比度调整图层,适当增加对比度,参数及效果如下图。

<图4>

<图5>
4、在图6上鼠标右键选择“图片另存为”,保存到本机,再用PS打开,拖到新建的画布里面,把混合模式改为“正片叠底”,不透明度改为:50%,添加图层蒙版,用透明度较低的黑色画笔把底部的过渡擦出来,如图7。

<图6>

<图7>
5、新建一个组,命名为“屋檐”。

<图8>
6、点击图9打开屋檐大图,并保存,再用PS打开,拖到新建的组里面,调整好位置,如图101。

<图9 点小图查看大图>

<图10>
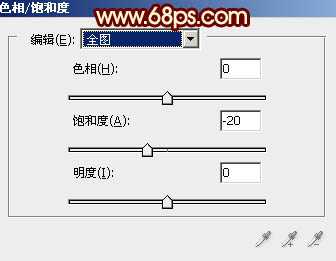
7、把屋檐素材复制一层,创建色相/饱和度调整图层,适当降低饱和度如图11,确定后按Ctrl + Alt + G 创建剪切蒙版。
<图11>

<图12>
8、把原屋檐素材复制一层,移到组的最上面,把混合模式改为“正片叠底”,用黑色画笔把底部过渡擦出来,如下图。

<图13>
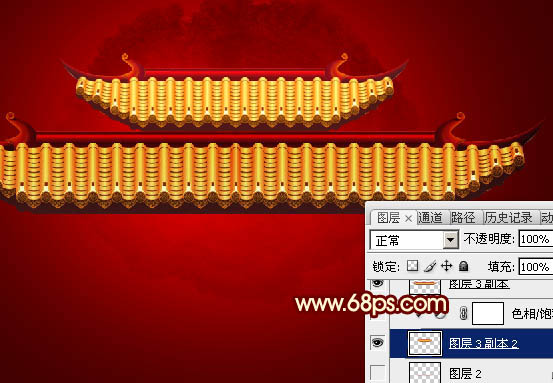
9、把原屋檐素材再复制一层,调整一下大小,如果太长,可以删除中间局部,如下图。
<图14>
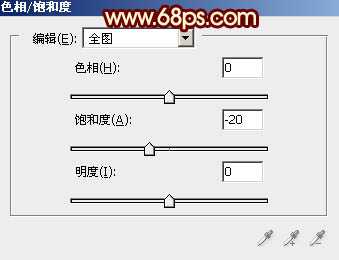
10、创建色相/饱和度调整图层,同样降低饱和度,如图15,确定后同上的方法创建剪切蒙版,如图16。
<图15>

<图16>
11、打开线框和梅花素材,拖进来,放到组的最下面。线框素材可以添加一点投影,如图19。

<图17>

<图18>

<图19>
12、加入中国结和灯笼素材,都是PNG格式,可以直接使用,然后调整好位置,如图22。

<图20>

<图21>

<图22>
13、新建一个组,命名为“装饰”,如下图。

<图23>
上一页12 下一页 阅读全文
制作贺卡之前,先多欣赏一下高手的作品,确定好像要的风格。然后搜集一些符合风格的素材,再按自己的思路去组合溶图等,做出像要的效果。
最终效果

1、新建一个1000 × 700像素,分辨率为72的画布,新建一个组命名为“背景”,如下图。

<图1>
2、在组里新建一个图层,选择渐变工具,颜色设置如图2,然后由中心向边角拉出图3所示的径向渐变作为背景。

<图2>

<图3>
3、创建亮度/对比度调整图层,适当增加对比度,参数及效果如下图。

<图4>

<图5>
4、在图6上鼠标右键选择“图片另存为”,保存到本机,再用PS打开,拖到新建的画布里面,把混合模式改为“正片叠底”,不透明度改为:50%,添加图层蒙版,用透明度较低的黑色画笔把底部的过渡擦出来,如图7。

<图6>

<图7>
5、新建一个组,命名为“屋檐”。

<图8>
6、点击图9打开屋檐大图,并保存,再用PS打开,拖到新建的组里面,调整好位置,如图101。

<图9 点小图查看大图>

<图10>
7、把屋檐素材复制一层,创建色相/饱和度调整图层,适当降低饱和度如图11,确定后按Ctrl + Alt + G 创建剪切蒙版。

<图11>

<图12>
8、把原屋檐素材复制一层,移到组的最上面,把混合模式改为“正片叠底”,用黑色画笔把底部过渡擦出来,如下图。

<图13>
9、把原屋檐素材再复制一层,调整一下大小,如果太长,可以删除中间局部,如下图。

<图14>
10、创建色相/饱和度调整图层,同样降低饱和度,如图15,确定后同上的方法创建剪切蒙版,如图16。

<图15>

<图16>
11、打开线框和梅花素材,拖进来,放到组的最下面。线框素材可以添加一点投影,如图19。

<图17>

<图18>

<图19>
12、加入中国结和灯笼素材,都是PNG格式,可以直接使用,然后调整好位置,如图22。

<图20>

<图21>

<图22>
13、新建一个组,命名为“装饰”,如下图。

<图23>
上一页12 下一页 阅读全文
兴国资源网 Design By www.nnzcdc.com
广告合作:本站广告合作请联系QQ:858582 申请时备注:广告合作(否则不回)
免责声明:本站资源来自互联网收集,仅供用于学习和交流,请遵循相关法律法规,本站一切资源不代表本站立场,如有侵权、后门、不妥请联系本站删除!
免责声明:本站资源来自互联网收集,仅供用于学习和交流,请遵循相关法律法规,本站一切资源不代表本站立场,如有侵权、后门、不妥请联系本站删除!
兴国资源网 Design By www.nnzcdc.com
暂无评论...
更新日志
2025年02月26日
2025年02月26日
- 小骆驼-《草原狼2(蓝光CD)》[原抓WAV+CUE]
- 群星《欢迎来到我身边 电影原声专辑》[320K/MP3][105.02MB]
- 群星《欢迎来到我身边 电影原声专辑》[FLAC/分轨][480.9MB]
- 雷婷《梦里蓝天HQⅡ》 2023头版限量编号低速原抓[WAV+CUE][463M]
- 群星《2024好听新歌42》AI调整音效【WAV分轨】
- 王思雨-《思念陪着鸿雁飞》WAV
- 王思雨《喜马拉雅HQ》头版限量编号[WAV+CUE]
- 李健《无时无刻》[WAV+CUE][590M]
- 陈奕迅《酝酿》[WAV分轨][502M]
- 卓依婷《化蝶》2CD[WAV+CUE][1.1G]
- 群星《吉他王(黑胶CD)》[WAV+CUE]
- 齐秦《穿乐(穿越)》[WAV+CUE]
- 发烧珍品《数位CD音响测试-动向效果(九)》【WAV+CUE】
- 邝美云《邝美云精装歌集》[DSF][1.6G]
- 吕方《爱一回伤一回》[WAV+CUE][454M]
